 |
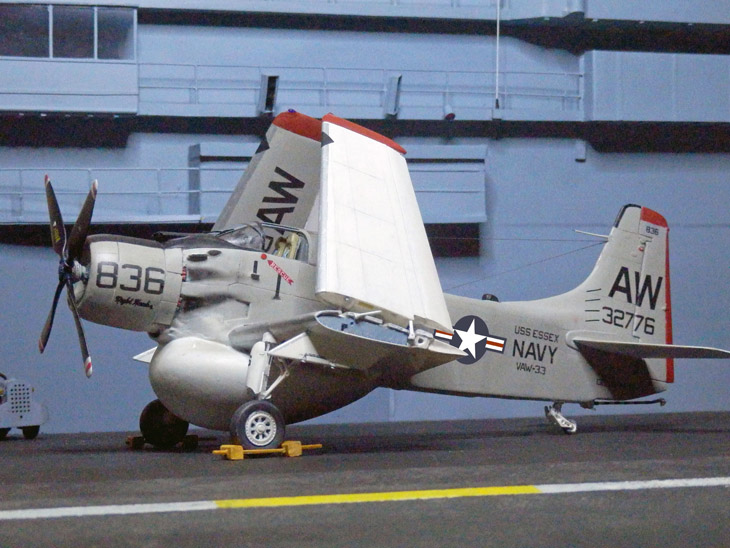
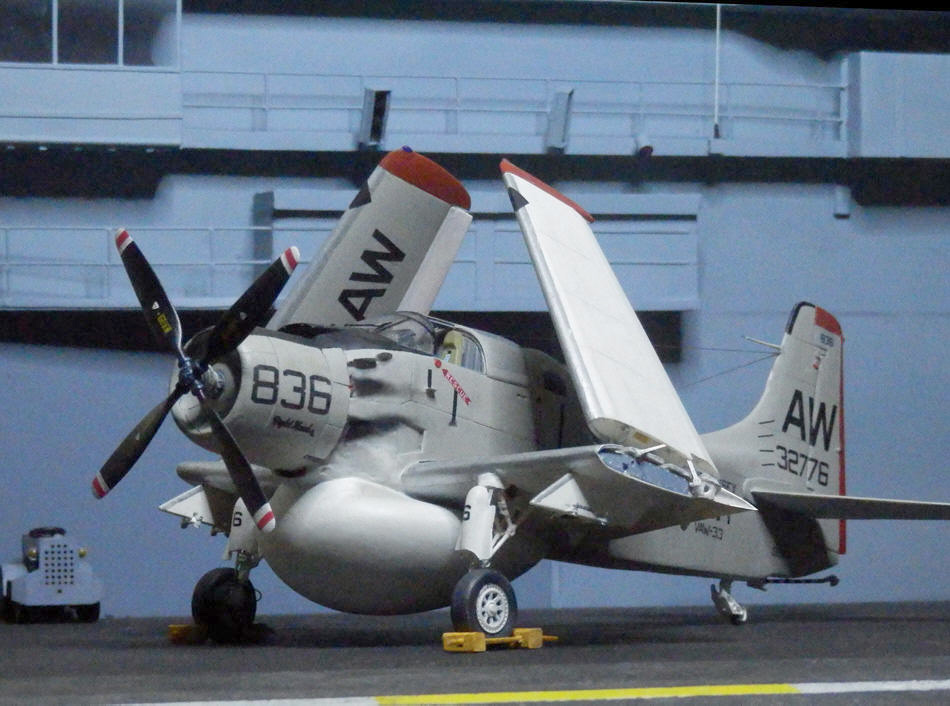
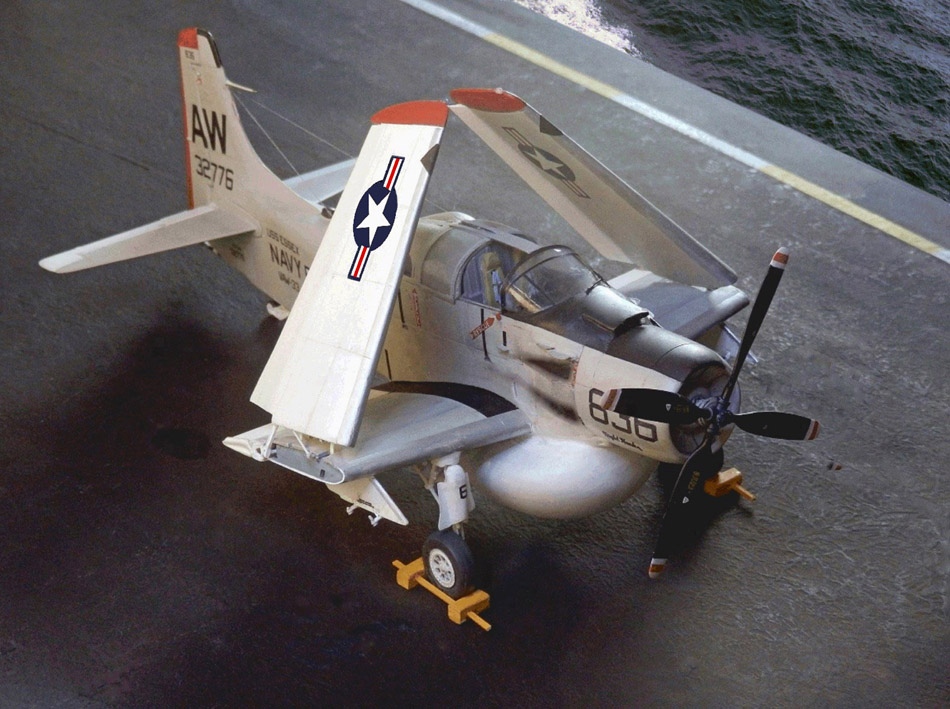
| Douglas AD-5W Skyraider, VAW-33 Night Hawks, CVS-9 Essex, 11/1961 |
| Matchbox 1/48 plus Scratch |
| 1. Plastikmodellbauclub Nürnberg e.V. |
| Modellfotos 3 | back to homepage | |
| Model and photos by Wilfried Eck |
|
||
|
The one seat Skyraider is well known, no question. But when it comes to the multi seat AD-5/A-1E the knowledge isn't spread so well. At least concerning model manufacturers. A long time ago you got a 1/72 kit by Monogram followed by Matchbox in 1/48. Both rather simple by today's standard and certainly out of production, and nothing to follow. The multi seat Skyraider was conceived shortly after the one seat one entered Squadron service, additional ways of use in mind. The outcome was the AD-5 basic multi mission version, and more speciallised ones for night attack- (AD-5N), anti submarine (AD-5W) and ECM aircraft (EA-1F) for the US Navy; secondary use was as VIP-transport, target tug and "station hack" to save flight payment for staff officers. When it was succeded by more modern types in the US Navy the USAF found use for a variety of missions in Vietnam, most prominent being escorts for rescueing downend pilots.
|
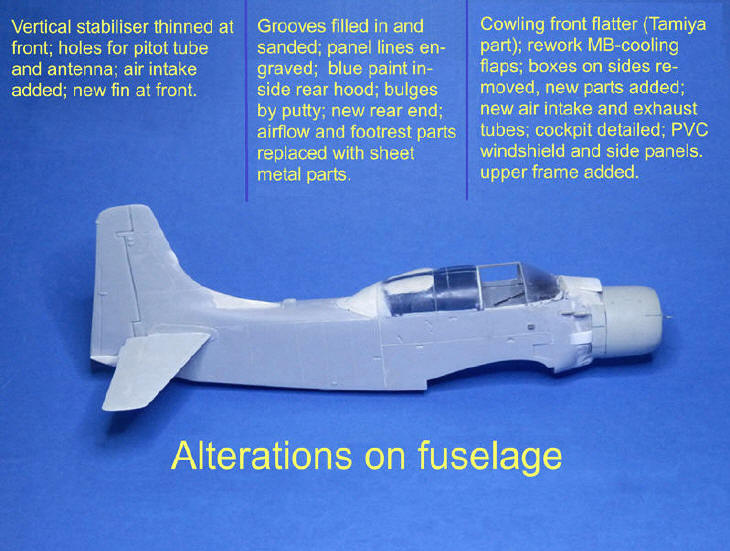
For building a model In 1/48 there is only one option, said Matchbox kit. Whether a resin fuselage by "Cygnus" (to be completed with Tamiya parts) is still available I don't know. In case it is don't forget to remove the armour plates on the Tamiya wings as the -5 didn't have such. To make things worse said MB kit is hard to get by (in my case dear Michael G. furnished the needed parts (thanks a lot). But there is a new offering by Revell you might say. Well, it's just new package and decals, the parts being still the ancient MB ones. Conceived in a time when quality was judged by the amount of moving parts. Basic and wrong in some places the wings are best of all. Monogram and Tamiya show rather thick profiles, rounded on both sides whereas MB's are markedly thinner with the correct concave profile on the lower outer sides. Check photos and you'll see the difference. As an additional bonus they can be shown folded. On the not so good side are: Motor cowling and rear end of the crew compartment are rounded too much the forward end of the vertical stabiliser being too thick and too rounded on the forward fin. The cockpit is sparse, the enclusures too thick. But if corrected one can live with it as long as one can live with some simplified details (changing the coarse levers of the flaps is mandatory). Representation of panel lines is a mixture of fine raised lines (mostly) and some "Matchbox-trenches". In the former case just to my like as I can engrave these lines as fine as I want to.. What had to be done on the fuselage otherwise is shown in the photo at left. According to an advice in the internet I tried to mate the forward end of the Tamiya fuselage with the MB rear, but it didn't work. Pulling the rear ends of the Tamiya parts apart results in wrong shapes of the upper and lower air intakes and in the outcome the rear fit is decidedly bad. Forget it! Whether a "Cygnus" conversion kit (resin fuselage, Tamiya parts needed) is still available I don't know. What everything should look like (excepting the chaff tubes a -5W didn't have) is to be seen at YouTube, "EA-1F Skyraider walkaround"
|
|
|
Change of the really basic MB-motor isn't necessary as a parked Skyraider has the cowling front closed. "blossom" segments grouping around the crank case. Well, having a leftover Tamiya cowling spared me to make these parts. The slits in the MB cooling flaps should be covered from the rear. As the kit upper air intake is much too broad at the rear I replaced it with a rectangular scratch made part (plastic card of appropriate height rounded at the top, two slits in the forward end filled with thin sheet metal rectangles, all covered with very thin plastic sheet, seam at the bottom). After it's glued in it's blended in with putty. Immediately behind the lower intake there should be a small rectangular air outlet. I made it witha scalpel.
The rear of the radome needed some adjustment and small
parts afterwards (please notice there is an escape hatch behind), in front
some putty was necessary.
The too rounded rear end of the rear crew compartment
needs alteration. I replaced it with a formed plastic part (like cockpit hoods).
|
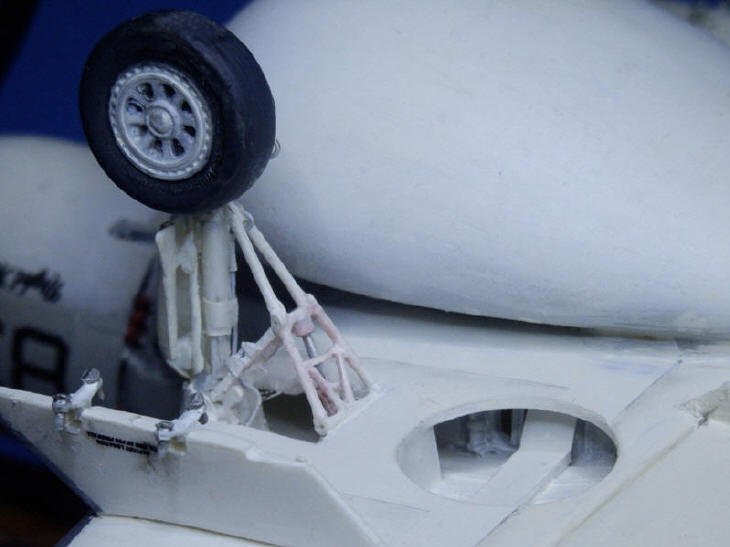
The somewhat simplified undercarriage is acceptable if one doesn't want to show the model upside down. Having had a closer look at the real appearance - said walkaround - I decided to make it myself nevertheless, especially when I saw the forward part of the frame wasn't round, being flat instead. The model main leg consists of a bent nail (ends cut off) as in my opinion real steel looks more convincing than paint. Covered with thin tube and rings made from an Evergreen tube heated over a candle and stretched to the required diameter. Same procedure for the rear hydraulic arm (missing in the MB u/c). Rear framework by rods and thin plastik strips. As my model was to show a carrier based -5W catapult hooks had to be fitted on the insides of the legs.
Concerning the covers detailing the landing lights of the USAF version is recommended, whereas the Navy version needs new ones as they are more rounded and broader at the uppper ends with cutouts for the hook halfway. In principle they were made like cockpit hoods (see "cockpit hoods scratch"):
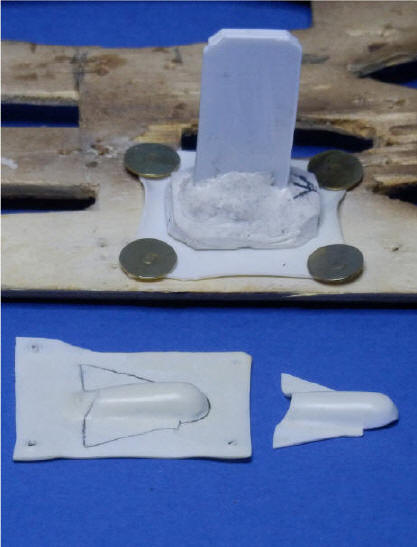
No need to carve and sand balsa wood blocks! Polyester putty is available since the late fifties of the 20th century (look for car repair). When mixed with 4% hardener paste it gets successively harder, in the outcome like hard wood. Is to say when it starts to harden it can be carved easily, a smooth surface being accomplished by sanding afterwards. Because of the left and right "wings" of the u/c covers a horizontal plate was made first, slightly larger than needed, then the rounded middle part was added (but not before it was placed on plywood to get the right shape of a slightly larger cutout). Afterwards a handle was fixed to the other side of the plate. Next step was to fix sheet plastic of approx. 0,3 mm over the plywood plate (thick cardboard con do it too) and then placed over a toaster. Switch "on" and wait until the PVC gets soft and shiny . Then it's time to place it over a cup or else and firmly and steadily push the polyester part though the cutout. Wait a few seconds, remove moulded plastic and trim to shape. The whole procedure is shown in scetch form for making cockpit hoods.
As the kit parts for the MB cockpit hoods are way too thick distorting the appearance of the finished model I replaced these parts by hand made ones as usual. See link mentioned above. Concerning the rear decking one wouldn't see much of the interior through the small windows of the -5W so the kit part did it with dark blue coloring on the insides, the bulges being applied with putty.
|
|
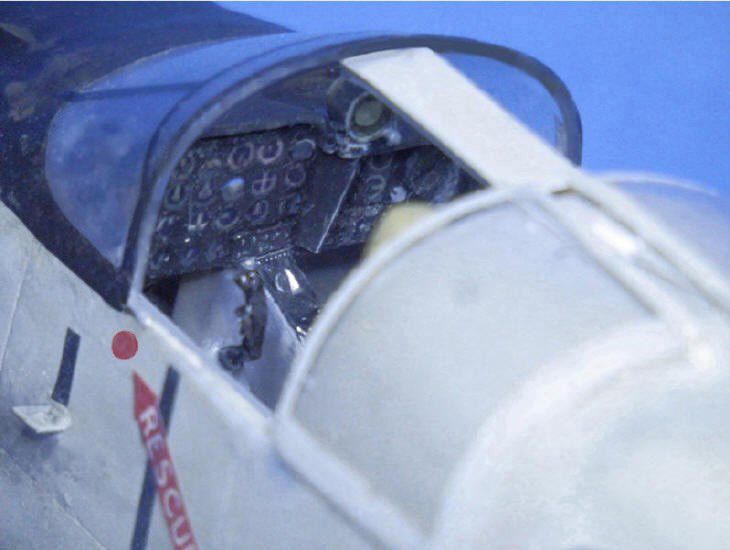
The cockpit interior is sparse to say the least. Except the upwards sloping consoles everything else is spurious. This may shy off most modelers. Well, as I don't know of any after market parts I had to live with it, make it or forget the whole thing. On the other side there is no super detailing needed as the folded wings blank off a lot.
The instruments were made by MS-WORD, assorted on a gray table; this scaled down, printed on white decal paper and fixed on a new instrument panel. Normally one would apply etched metal instrument cases, but if they are in scale size they wouldn't fit as the instrument panel due to not-to-scale side wall thickness is too narrow. So this idea was discarded and a sheet of transparent PVC placed over the instr. panel and the instruments masked with Humbrol Maskol. As the Skyraider instr. cases are of square form grinding depressed lines was sufficient. Knobs on panels were made by embossing thin aluminum sheet from the backside, then painting the front side light gray. After this had dried thoroughly black paint was applied; if it is applied thin enough sparing the knobs one gets an adequate impression (to remove unwanted paint simply wipe over it). Radar displays rings from an Evergreen-tube; glass by epoxy glue.
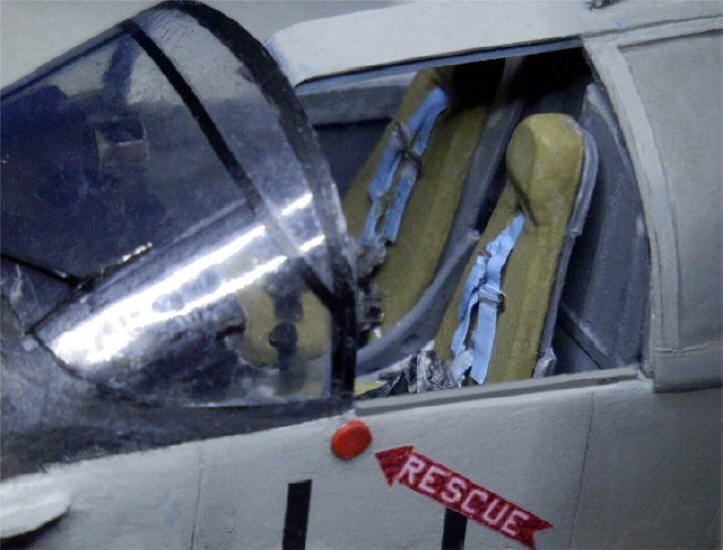
Seats carved and sanded plastic. Belts metal foil suitably painted. As the kit control column is too narrow a new part was used.
|
|
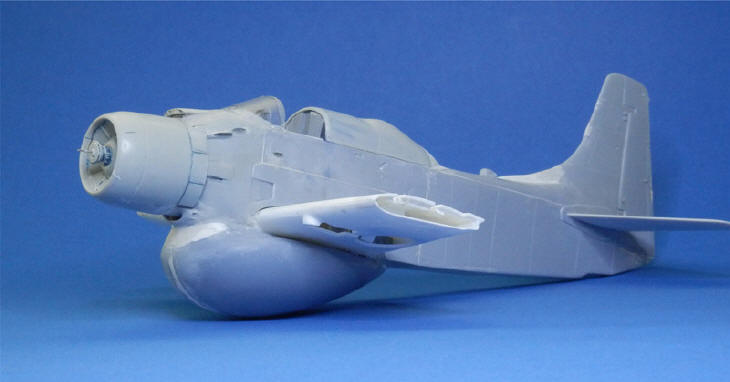
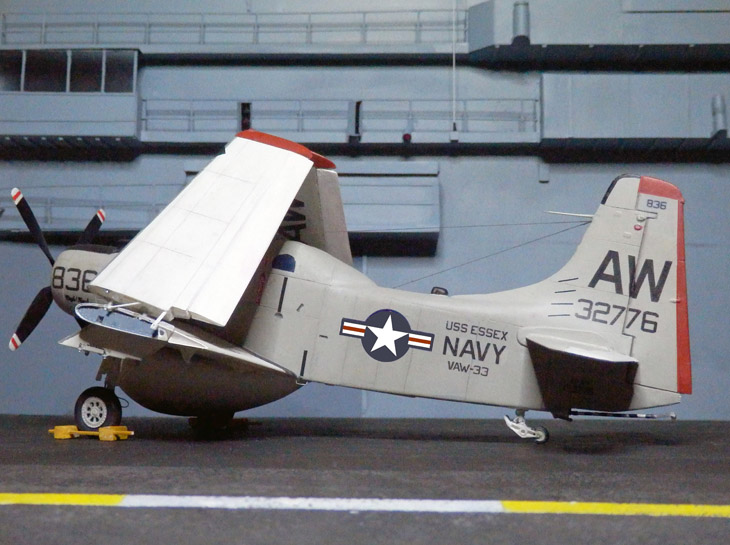
Wings: Showing the model with wings folded kit (mandatory on parked carrier aircdraft) is easily done as MB provides the necessary parts (regrettably the rear arm not far enough). But this makes the coarse arms of the (moveable) flaps even more visible. As no real Skyraider in parking position has its flaps hanging down they were glued in and the two part levers made by scratch (triangular shape at the rear, flattened rod in front). As the flaps weren't simply cut off on the outsides, clearly showing its sheet metal covering instead, the inner sides were thinned out and after mating upper and lower halves a bulkhead was inserted. Due to mechanical reasons in folded wings both ailerons of the Skyraider are in a slight up position, so the kit parts were cut out, the fronts filled in, and then glued in accordingly. The kit provides a bulkhead for covering the opening in the inner wing. In the real thing a tarpaulin was buttoned in. I used the bulkhead part as a template to make a representation of this part, again thin aluminum sheet. Buttons by printing from the back side. After the paint on the outer side had dried the "tarpaulin" was glued in careful scratching revealing the buttons. Necessary levers were added after the wing parts were glued together.
|
|
| A plastic pitot tube is easily broken off so I replaced it with a part consisting of a core of steel wire covered with thinned down plastic tubing. |
| Metal wire was also used for the entrance steps behind the wings and hydraulic lines on the landing gear. Antenna wire thin strands of tights, stretched to get the crinkles out (as it is elastic it won't break when getting some unwanted hit). |
| Navigation lights formed transparent kit part (see page "Lights"), color with transparent marker. |
| The wiper was made of a flexible arm by stretching the (PVC-) arm of a cotton bud over a candle with a wiper blade made of thin sheet aluminum. |
| Standard paint of "Light Gull Gray" (FS 36440) on upper sides, "Insignia White" (FS 17875) on lower sides, landing gear and upper sides of ailerons, flaps and elevator. Cockpit "Dark Gull Gray" (FS 36231), Leading edges "Aluminum", Trim color "Maroon" (Red and Black mixed). According to the FS-number "3..." stating "non specular" (not dull matte!) resp. "1" ("glossy" but not air show gloss) these colors got a layer of appropriate semi-matte. All paints Humbrol resp. Revell. |
| Decals: National insignia (the blue should be nearly black!) stock, inscriptions own creations by MS-WORD and transparent decal paper. |
| Exhaust stains were made by applying pastel dust with a cotton bud; in the same way but with middle gray pastel some decent highlighting of panels. |
| No "ageing" of any kind as in Navy use carrier aircraft are kept in pristine condition. |
Conclusion: I don't think everybody is now going to build a Matchbox/Revell Skyraider kit, but maybe one or another step can be useful for other models. A kit to today's standard is dearly needed!
 |
![]()