|
|
|
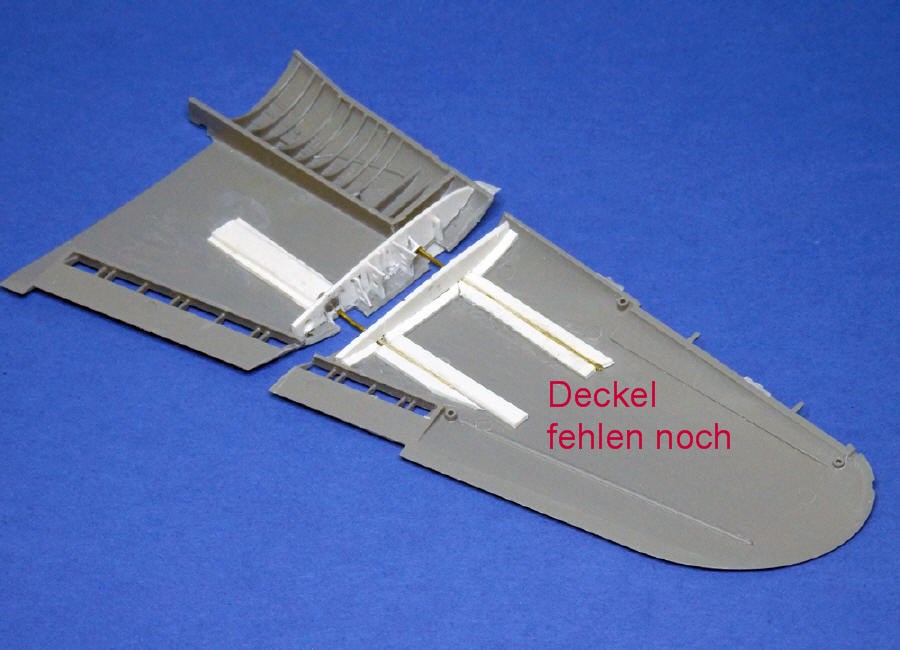
In principle making folded wings follows
the same way: Seperate outer wings, file outer edges to scale thickness;
see for arms or hydraulic lines of the real aircraft. This is to conceal
the brass wire holding the model wings; add bulkheads with holes
for the wires in inner wing; insert brass wire parts into narrow "houses"
(= two narrow strips with gap in size of the wire with top
placed after insertion of the wire). Place outer wing in exact
position (wires help) and repeat adding bulkhead and "houses". Whether
you like to bend the wires first or after adding the upper halves of the
wing is to your choice. In any case inner and outer wing parts have to
be seperated as detailing of the visible parts fof the bulkheads is
needed. Admittedly in case of the Helldiver this took some time
(and patience) but is manageable. |
| |
|
|
| As the only
1/48 SB2C-4 kit I know came from Accurate Miniatures I supposed this kit
being reboxed by Revell. So not too bad. But I was mistaken,
the instruction leaflet stating Monogram. Never heard of such a kit. In the first
moment I even assumed some short run attempt, but instruction leaflet
and a close look at some parts revealed this Helldiver being rather
complex in some regions. Alas the instructions were of little help. They
are the weak point of this kit. I suppose Revell got the formed parts but
no instructions. So somebody without knowledge of the real aircraft had
to have a look at the appropriate parts and assume how they should get
together, drawing arrows in the approximate directions. In example: The hydraulic
jacks for the bomb bay covers are to be placed near the front and rear
ends. In reality it's up to the modeler to guess the exact positions,
Immediately besides the bulkheads or some way further away. There is no
pin, no hole or other indication where to fit in exactly. |
| |
|
On the plus side PE parts for the dive
brakes, ignition cables, the perforated ring of the MG
mount, and an assortment of smaller parts
including buckles for seat belts were quite helpful. |
| |
| In case of the fabric covering the kit falls way down. Deep trapezoidal depressions
with sharp edged ribs in between create something akin to the rudder of an
A-4 Skyhawk, Certainly not the way it looked like in the real
thing. But that's exactly the way I can live with: Simply fill all
depressions with putty, even it to a smooth surface and sand it smooth
after the putty has dried. As putty usually shrinks a little bit
afterwards this generates the surface real fabric covering shows (see
photos in German page "Bespannung"). |
| |
|
Detailing of the front
cockpit is adequate, though a throttle and adjacent levers would have
been fine. So I had to make them myself. Contrary to the instruction
leaflet and modellers belief the seat belts of USN aircraft of this time
and well into the 50ies did not run over the seat back rest, but over a bar behind/above
the seat instead (correctly included in the Monogram seat). A
pilot's figurine is also included, but as the needed second crew member
is missing it's good for the spares box and nothing else (no pilot flew
alone). Though the
transparent parts are clear and adequately thin, I couldn't use them.
I don't like too prominent framework (flush in the real one), and I got
problems with masking the various window panes. In the outcome after a
few futile attempts I referred to the proven way of scratch building (certainly
not using a balsa block!, see appropriate page C,cockpit hoods scratch). Frames by
suitably painted decal strips. |
|
|
|
Concerning the complex
rear crew station and the said poor instructions I doubt the average
modeller will get it right. Again no location pins or else.
Especially and wrongly so when it comes to the
placement of the tubular raft container, in the original aircraft resting to the left
of the uppermost instrument box. Revell wants this
container to be glued to the inside of the clear part forming the
front hood. This done would not only show ugly glue marks, but prevent
this combination to be placed flush with the rear end of the fuselage as
the kit container is too thick, resulting in the clear part to protude
over the fuselage side. So I had to make the tubular container with
handling device by my myself. Whether a bad fit of the instrument
bulkhead at the bottom is fault of Monogram or myself I can't decide, so check before
cementing. The machine gun with PE visor parts was fixed horizontally,
This was the standard way of stowing. Never, never
obliquely over the rear hood. In this way the rear hood couldn't be closed and firing
the guns would have been restricted to a very narrow field.
In reality the guns were first pulled aft, the rear decking
lowered to give a wider coverage of fire, and
the guns placed into firing position. ammunition belts weren't provided as PE parts mine came from the spares
box. Antenna wire thinned thread from tights. |
| |
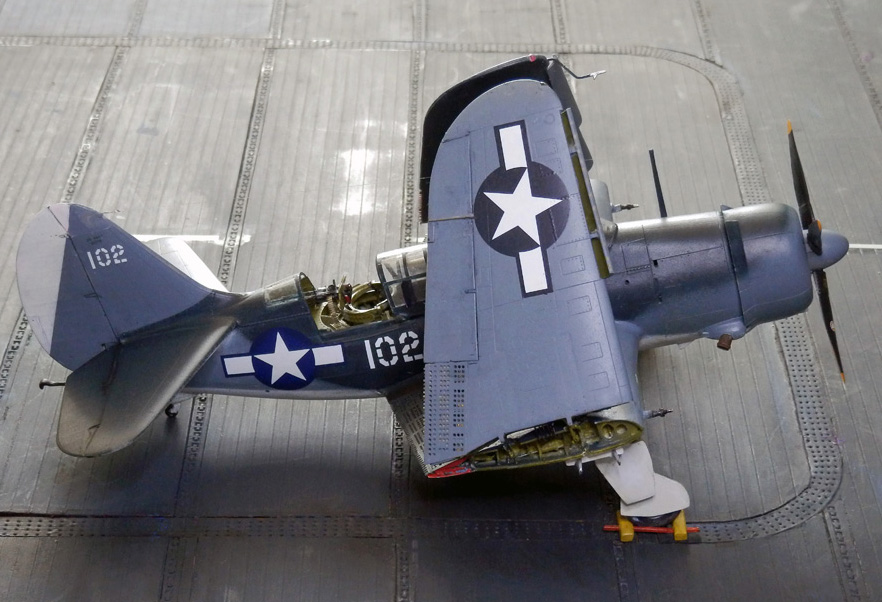
|
The "highlight" of the
instructions is to be seen in the last pages, showing markings for a
SB2C-4 from CV-9 Essex and one SB2C-5 each of the French and
Italian Navy. As the kit contains parts for the -4 version only,
applying decals would not be sufficient. The -5 differred noticeably in the cockpit, framing of the hood, bomb bay
and doors. Colors are identified by screened squares, some very
much alike, leading to an alphabet which Revell paints
are to be mixed. In the outcome grossly
wrong. Instead of the usual tri color paint Revell states five (!) colors.
Contrary to USN standard the author makes one
believe the undersides of the outer wings and the vertical stabiliser
were not the color of the fuselage sides, but different (some tint
nobody heard of). To get Sea Blue for the uppper sides 60 %
"Lufthansa Blau" (.. blue) and 40 % "Weiß" (white) have
to be mixed, resulting in a light blue gray color. For the other two >other
aircraft Revell "expert" reverses the grade of sheen. Late Helldivers were
painted Glossy Sea Blue over all, the portion in front of the cockpit
being non specular to reduce glare. The author wants the contrary, the
upper front to be glossy and the remaining surfaces matte.
In summary: The shown markings are o.k., but otherwise these instructions are the
worst I ever saw. |
| |
| For the
real appearance of colors see page "Originalfarben US Navy" (sorry,
only German text)- |
| |
|
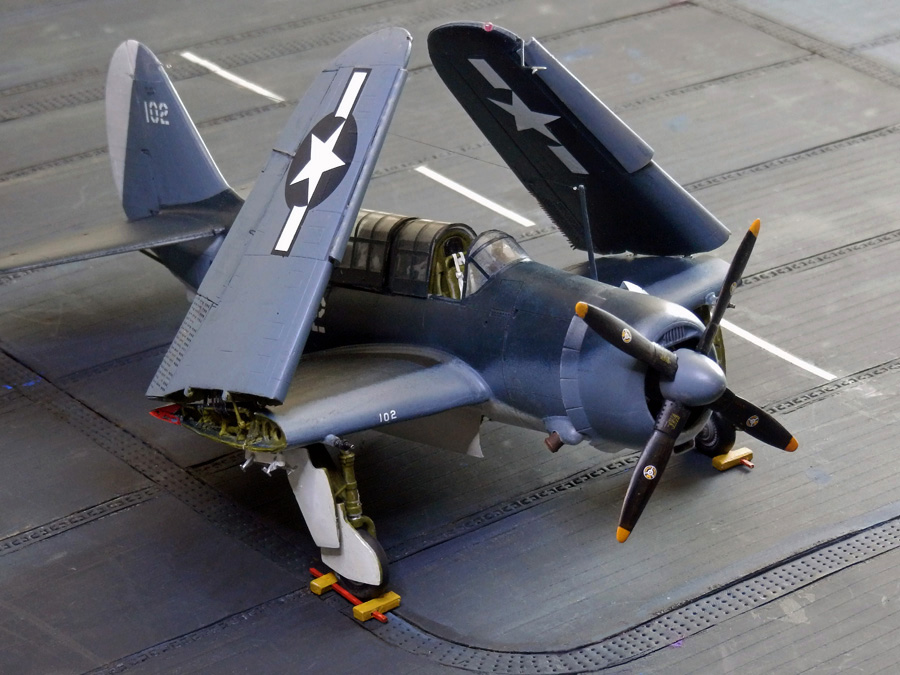
As most models show said "Essex" based
Helldiver I chose one from VB-9 on board of CV-10 Yorktown II. This
necessitated making the identification numbers and the tactical marking
myself and the
national insignias as well as the ones supplied in the kit were too
large. |
| |
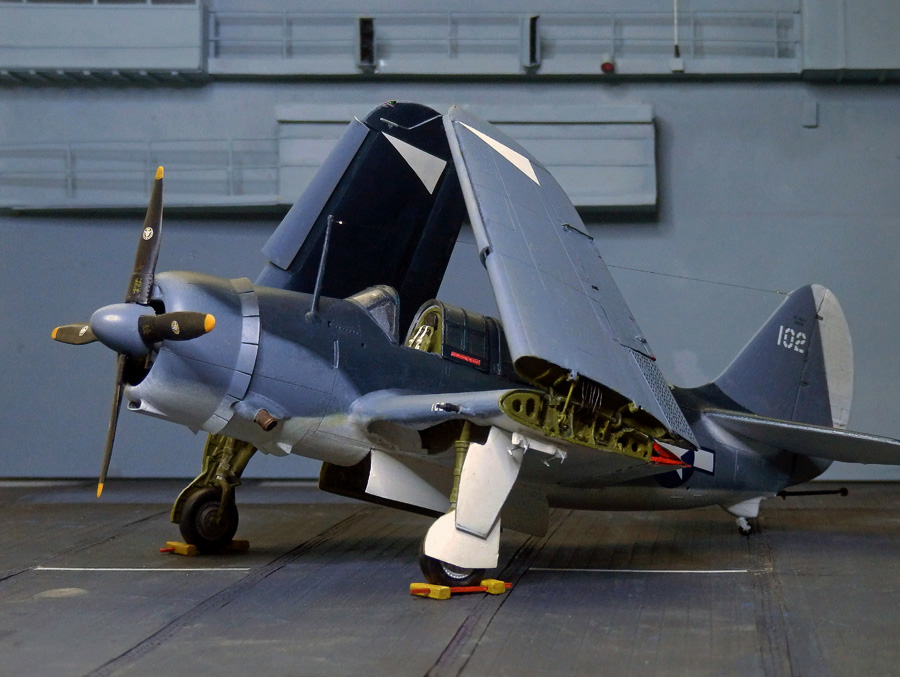
| I used Vallejo
Model Air "Glossy Sea Blue", "Interior Green" and "White" which show the original tints very well.
(Vallejo "USN Sea Blue" shows "aged" paint). As I
couldn't get Vallejo " Intermediate Blue" UA45 by LifeColor was
used instead with very convincing results. Naturally with a final
coat of non specular clear paint. No "ageing" as the operation
time of VB-9 was relatively short and the waters south of Kyushu are not
the south sea with "hot tropical sun". The same goes for chipping paint, never to be seen
on an aircraft carrier. No "highlighting" of panel joints as the SB2C had
overlapping panels. Long exhaust stacks prevented soot on the
fuselage sides. This results in a rather clean model, devoid of any
artistic applications (some may call it
boring), but I can live with it as my intention was not a piece of
modern art, but - if possible - a model showing what a real Helldiver on
board of CV-10 looked like. |
| |
|