 |
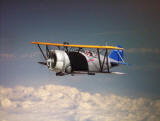
| Grumman F3F-2, Accurate Miniatures 1/48 |
| Modifications and additions: |
| Model by Wilfried Eck | ||
|
||
|
|
Generally this model was built straight out of the box. But a few refinements deemed necessary:
For a photo showing the model “in flight” a pilot was necessary (not furnished by AccM). As usual mine is scratch built, though in effect some alterations to a kit figure would do it. But then in most cases the neck, being too short, has to be elongated. The most important part, the head, came from a “Preiser”-figure. And, even more important, goggles were needed. After some unsuccessful attempts I came out with the following solution: File sprue to inner dimensions of one half, wind some very thin copper wire around it and – take care! – repeat process for second half (altenative: glue two identical parts to a base and wind wire around both). The outcome should look like a Brezel (pretzel). Paint silver and let dry. Now spread clear two component glue onto an even surface and press “glasses” slightly in. After this has dried paint desired colour around rims and remove excess material. Lift off and bend slightly to shape. Use glue very sparingly to fix onto face. Meanwhile the helmet had been formed using “plastic paste” (plastic filaments soaked in liquid glue). Goggle straps are strips of decal painted khaki. Parachute harness etc.: Strips from the metal cap of a wine bottle painted off white. Life vest: Thin plastic, painted dirty yellow; some liquid glue on the backside helped to soften it so it could be shaped to form.
Windshield and canopy seem o.k., but the struts are decidedly on the prominent side. In the real thing the struts were flush with the panes. So, again, homemade ones were substituted. How to make canopies is described on page weC. To fix the windshield the portion where the kit part would rest has to be removed. Otherwise the home made windshield would rest too far inward. This part was made slightly larger on the lower side to accept the glue, “plastic paste” being used again as it sticks and fills as well. Naturally the clear part was masked at first. Struts on windshield and sliding hood are thin strips of decal painted in suitable silver.
The gun sight was made from two parts: A thin rod from the kit clear plastic tree was heated over a candle and stretched to appropriate diameter. When cut to the desired length the ends resemble lenses. An Evergreen tube was thinned the same way, it formed the outer tube protuding slightly over the front and rear lenses. The rear and got an additional small ring (the rubber to prevent injury). Colour was a question. As in photos it appeared light I coloured it cream.
The antenna wires are from thin (!) strands of a used stocking of my wife. They should be almost invisible. Antenna masts thin steel wire. Front tubes of machine guns stretched plastic tube (If an exact diameter is necessary find some metal rod of slightly less diameter, put it into the plastic tube, heat and stretch. The plastic tube will adhere to the rod and can be removed in the appropriate length.
Colours and markings to your taste (the decal sheet offers all alternatives).
General thoughts and tips for modeling see "Modeling ABC"
|
|