|
|
Modelling-ABC by Wilfried Eck |
C
|
|
Mobile airfield. Projection of power. The political value of an aircraft carrier consists in its mere presence, the option to lend military weight to the politically declared will to attack targets of one's own choice even far from land bases.
The range of an aircraft carrier is not determined by the number and caliber of
its guns, but by the number and range of its aircraft and their load. Conversely,
insufficient range and/or unsuitable aircraft render a carrier useless (cf.
example of the German carrier "Graf Zeppelin" ).
Doubts about the value of aircraft carriers
in the 1930s settled themselves during World War 2. With a steadily growing
number of fleet carriers (CV) with deck lengths of 876 - 888 feet (80-100
aircraft) and cruiser-hulled light carriers (CVL), deck length 1623 feet (34 aircraft), World War II in the Pacific proved that aircraft carriers, not
battleships, were decisive in modern naval warfare. Aircraft were used to gain
air supremacy and preparing landing operations, in short, to gain naval
supremacy. Japan, which had a strong carrier fleet, was so weakened after losing
four carriers at Midway that offensive warfare was no longer possible. So-called
escort carriers (CVE), deck length 512,5 - 557 feet (about 30 aircraft),
also played an often neglected but indispensable role. Initially converted from
existing ships, especially by the British, they were later produced in two large
series in the USA. In the Atlantic, they were used by the British to secure
convoys and by the Americans for anti-submarine warfare. Their main task,
however, was training and a wide variety of missions in the Pacific.
The armament with anti-aircraft guns in front of and behind
the island and on the deck edges, which was common until the 1960s, was
dispensed with in the course of time. Defense against enemy aircraft is now
assigned to the escort ships.
Sailing alone, an aircraft carrier would be a large and vulnerable target. In
the U.S. Navy, it is therefore always surrounded by cruisers and destroyers and
at least one submarine, which provide security. In addition, there are supply
ships if necessary. For other countries, the number of escort ships may vary.
The advantages of an aircraft carrier - high
maneuverability and operational capability - are offset by the immense
construction and operating costs and its limited space. While an airfield on
land already covered several square kilometers of space in World War II, the
deck of an early Essex-class fleet carrier (CV) was only 876 feet long, and
that of an escort carrier even shorter. This space had to simultaneously provide
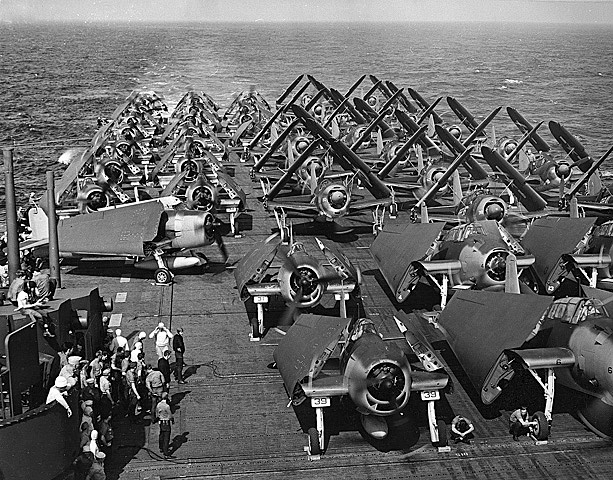
the aircraft required for the mission, but also allow takeoff and landing.
Folded wings were indispensable if nearly 100 aircraft were to be deployed on CV
carriers and 30 on CVEs. This was only possible with sophisticated takeoff and
landing techniques, but they were also accident-prone. The angled deck first
introduced on the CV-36 "Antietam" in 1952, combined with an optical approach
aid - both British inventions - helped to significantly reduce the accident rate
during landings. Now, instead of landing along the longitudinal axis of the ship,
the aircraft landed on a separate runway angled at 10-15°, so that a takeoff was
possible if a catch rope was missed. As with the launch, the carrier's airstream
at around 30 knots (56 km/h) contributes part of the necessary lift. However, it
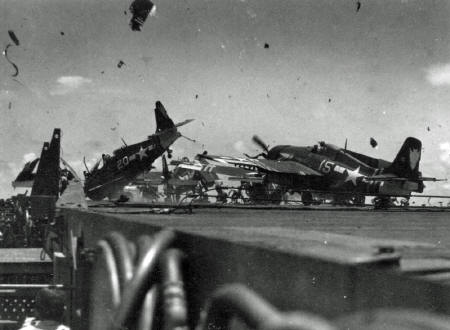
is still not completely safe to be on deck. Whereas in the past it was spinning
propellers or unsuccessful landings, nowadays it is air intakes into which one
can be sucked or jets of air that can blow a careless person off the deck. Today,
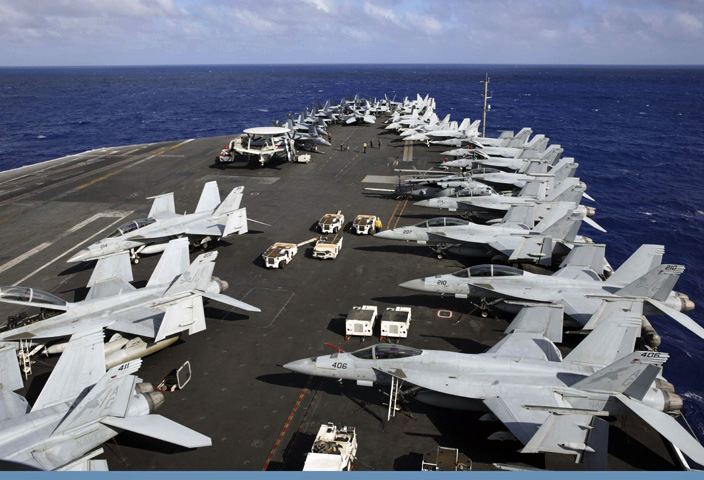
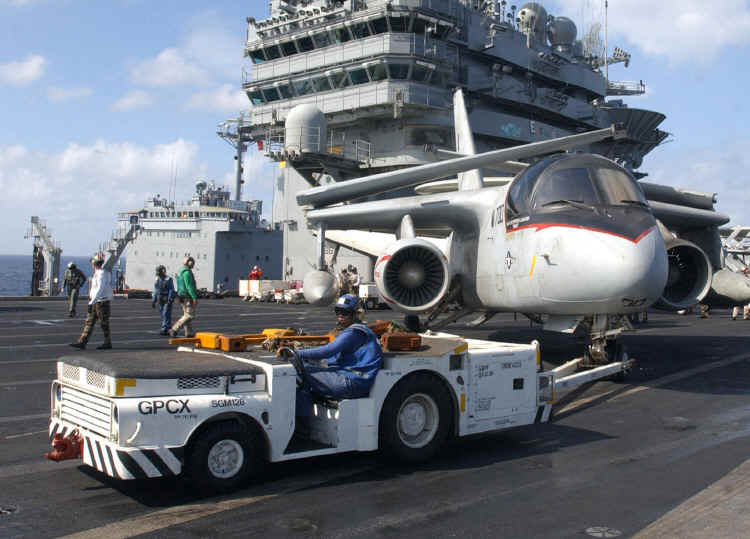
special vehicles take over the pushing around, but it is still a tight squeeze.
|
Flight
Operations:
A landing is a challenge even for today's pilots (m/f/d), especially at night. Although optical and electronic aids help to keep the aircraft precisely on course and in the exact approach angle - which deviates from the ship's course! - , the speed of the aircraft is subject to narrow tolerances, only a few knots (à 1.8 km/h) above the limit. However, once the landing hook has caught one of the four steel cables, the only thing left to do after taxiing out is to retract the flaps, fold up the wings, and follow the signs from the ground crew to the parking area. As far as parking spaces are concerned, not only the space on the starboard side of the ship is used, but also that on the port side at the rear end of the runway; helicopters stand around the so-called island, the control and command center on the starboard side. For takeoff, all the planes were tightly packed on the aft deck in the past (bombers in the rear, fighters in front). All the propellers were spinning because the engines had to warm up first. Because there was little more than 100 meters to taxi, pick up speed and get enough lift for flight, the carrier's speed was increased to about 30 knots (56 km/h). When everything was ready, the launch officer waved the first aircraft forward, the wings were unfolded to flight position, and then the engine was run up to full power (the pilot stood on the brakes at this point). Release by the launch officer when the deck began to lower forward. To get more speed, the pilot raised the tail after a short roll (flight position), but lowered it again just before reaching the edge of the deck to give the wings more lift. Then turn sideways away, go up to altitude and join the formation. An alternative launch method was by catapult, of which there were one or two powered by compressed air. Today, launches are done exclusively by catapult. U.S. carriers have four of them. These include hydraulically raised partitions so that the jet stream cannot cause any damage. Which catapult is responsible for which aircraft has already been determined in the operations center and is communicated to the directors, who are identifiable by their yellow clothing. Catapult personnel dressed in green then direct the aircraft to the launch sled and check that it is hooked in safely. The launch officer, also in yellow, gives the signal to start the turbine(s) after confirmation, and after the pilot and catapult operator have signaled readiness for launch, the launch officer gives the go-ahead for the launch (nowadays no longer by steam, but electromagnetically) with his arm stretched out forward. All this has to take place without any time delay, because this costs time and thus fuel. When you could not refuel in the air, this made the difference between landing on deck or in the water. |
See also links below. - For details to all US-carriers and photos see very recommended page: "navysite.de"
*******************************
Modeling:
Model builders want to see their
work looked at, praised and, if possible, awarded a prize. The model must look "interesting"
according to common understanding.
Properly built models of carrier aircraft automatically attract attention. The
visitor is used to seeing airplanes as airplanes look. A fuselage with wings and
tail unit. If the model deviates from this because it appears to have wings that
are too short, his gaze will automatically linger on it. Likewise, if the
airplane looks "normal" but has a pilot in it, because that is rarely found
nowadays. The model is more attractive in both cases.
Why, I ask myself, do they keep
building like everyone else? Wings folded out, cockpit empty. Even worse: like
all the others, with maintenance panels and tools draped on the ground.
A realistically built model of a carrier aircraft would show the opposite:
|
|
Folded wings: Sometimes resin parts are available. Otherwise, you can do it yourself. It is easier than you might think and more stable than resin parts. See the page . It is easier than you might think and is also more stable than resin parts. See the page " How to make your own folded wings". - And by the way, it also saves space in the display cabinet.
Pilot figures and deck personnel: A drama! - There are offers for deck personnel
from time to time, but this makes little sense if pilot figures are missing. A
take-off or landing officer does not direct an empty airplane. When modern
"plane handlers" are at work, the wings are folded.
Why pilot figures sitting in an airplane are almost never offered, was to be learned from Preiser and other manufacturers at the Toy Fair in Nuremberg: Reproduced anatomically correctly, they would not fit in the seats. The reason for this is that the side walls of the cockpit are too thick to scale and, as a result, the entire cockpit, including the seat, is too narrow. The smaller the scale, the more (end quote). In addition, the side walls of the seats are usually reproduced too thick, which further narrows the space for a seated person.
When I have needed a pilot sitting in the cockpit, I have encountered the above problem as follows: Backrest and side walls of the seat made of thin aluminum sheet, placed around the seat of plastic material and glued. Butt end of homemade pilot figure adjusted to fit inside the seat. Due to the arms on each side, it's not noticeable if it's a little narrower at the bottom. The deck personnel was also homemade. Either existing figures were rebuilt or carved right away (heads and hands from Verlinden or from figures that were not usable). See model photos in German pages "Modellfotos 1" and "Modellfotos 3".
Otherwise:
If a Wildcat, Hellcat, Corsair or Avenger has a geometric marking on the
vertical stabilizer (see
Markings of the US Navy II), it was stationed on an aircraft carrier and not
on a South Sea island. Aircraft carriers preferably operated in the Central and
North Pacific. Islands that could be considered for an emergency landing were
Japanese occupied. - In contrast, F4U Corsairs in
tri-color paint schemes were
stationed only on conquered atolls and not on aircraft carriers.
There was no coexistence of US Army Air Force and US Navy aircraft on Pacific land bases. Jurisdiction and strategy were too different for that. Moreover, the respective theaters of war were increasingly far apart (See Milestones of the Pacific War). However, with respect to the Marine Corps in 1943-1944, when US Army B-24s were preparing the next conquest. P-39s and P-40s on New Guinea carried Australian insignia, those on Guadalcanal, to the east of it, those of New Zealand.
Extended landing flaps, dive flaps and rudders may make the model more interesting, but it is not realistic. Everything is retracted immediately after landing and secured against uncontrolled movements (rudder and elevator on WK II types by bracing the control stick).
On the SBD Dauntless and SB2C Helldiver dive bombers, the upper flaps were pure dive brakes that would have been a hindrance during takeoff and landing. On the Helldiver, the MG's did not protrude 45° above the glazed cover in the rear position. This would have resulted in a very limited field of fire. When stationary and in cruise flight, they lay flat under the cover; if they were needed, the cover was lowered after the weapons were extracted.
Contrary to what recolored black and white photos and some manufacturers would have us believe, WW II flight decks were by no means wood colored. See photo above. The fir wood used to save weight was colored for several reasons: First, yellow-brown wood would contrast too much against the blue/blue-green sea, thus representing the opposite of camouflage; second, wood soaked by sea water or rain would add weight above the waterline, thus reducing stability. Third, bare wood is slippery. About the color on US carriers (see also links below): Basically the same as the fuselage sides of the aircraft, i.e., blue-gray first (analogous to ANA 608, FS 35164), then black-blue (ANA 607, FS 35042). Marking stripes on blue-gray light gray, on blue-black camouflaged strangely (because of kamikaze?) black. On Japanese green tones; British not ascertainable with certainty. Modern carrier decks have a mineral-containing rubber layer to prevent slipping, which is actually anthracite-colored (see second photo above), but also changes to other colors depending on the incidence of light.
Useful links:
|
|
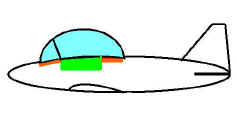
In former times model canopies had engraved lines to show where paint was needed to show the frame/s. Very practical as no masking was needed, and in the outcome very convincing too. Modern kits show canopy frames prominently raised (in 1:1 scale they would stand out inches). Clearly overdone, see cockpit frames below.
Replacing an incorrect cockpit canopy or one with too protruding a frame with a homemade one is not that difficult.
No balsa wood is needed!
For the inevitable form there are two alternatives:
Do not use the outer side of the kit canopy as this will make the new canopy too big. Using the inside for filling with polyester paste is possible, but as the kit hood is thicker than the PVC used adding of another layer is necessary.
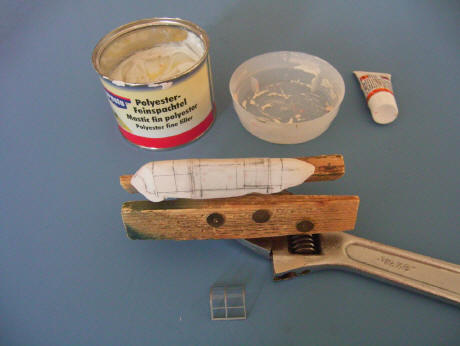
The best way to start is to stretch a piece of paper over the cockpit area and trace its contours in pencil. This piece is attached to a suitable piece of plastic and cut out. Walls of thin plastic glued on create a tub that exactly matches the horizontal cross-section and can be filled with putty. This mass gradually hardens, so that at a certain stage you can begin to roughly carve out the future shape with a sharp knife or sandpaper. It is a matter of taste whether one goes straight to the finishing work after hardening or continues by adding the purposeful overhang for tabs at the bottom. For this, I put tape all around and fill in another layer, which I colored dark with scraped pastel chalk. That way I can recognize the dividing line later. In this second layer, a wooden block or whatever else fits, so that the form later stands upright and you have enough space to pull. How it's done see below.
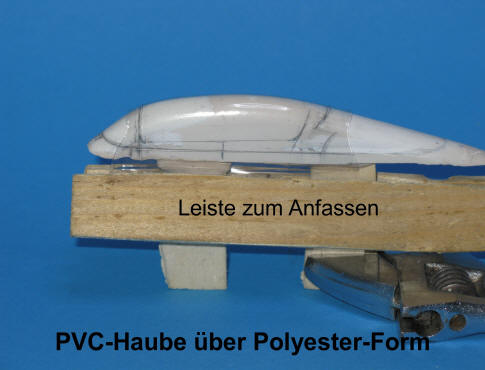
For the canopy itself a sheet of clear PVC needed (0,3 - 0,5 mm; materiel from a blister package may be used too if it's thick enough). To soften it, you need heat, preferably with the help of a toaster. The clear PVC is attached to two ledges with thumbtacks for better handling, then you put on gloves and hold it over the toaster (turning it over in between helps) until it starts to shine and sag. Now quickly to the form and put around with a steady pull.
The main problem isn't the forming of the canopy, but how it is fixed to the model aircraft. CA glue is not recommended because it will make the canopy get milky. I prefer epoxy glue. Where the canopy can be fixed depends on the individual aircraft (brain power necessary), but usually it's possible to use tongues for fixing to the cockpit inner sides, front and rear part resting in pre cut grooves (later filled with putty).
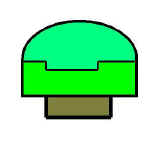
"Pulling" the PVC hood:
Quotation marks because "pulling" can easily be misunderstood as "tugging". You should gently but persistently lay it around in a continuous motion.
The whole affair step by step:
 |
|
||||||||
 |
|
||||||||
 |
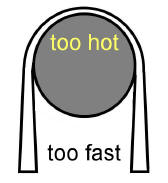
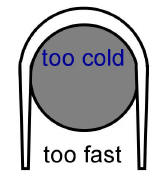
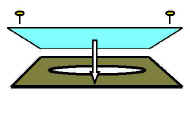
Heat evenly over toaster, preferably from both sides until the PVC gets soft and saggy. | ||||||||
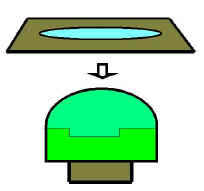 |
Pull firmly but steadily over form, plastic facing downwards |
||||||||
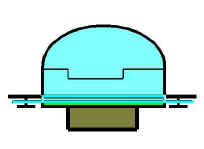 |
Wait till plastic has settled, then cut along prescribed lines on form |
||||||||
 |
Remove needed part |
||||||||
 |
|
||||||||
|
Mistakes: |
|||||||||
|
|
If it doesn't work the first time: Well, this can happen. But you can use this part for last corrections of the lower contour if necessary (new line for cutting on the form).
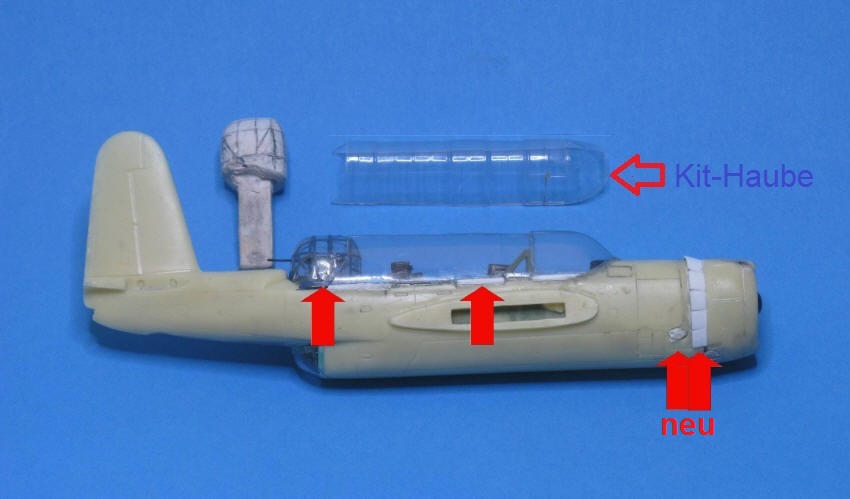 |
| homemade canopy and turret, strips of painted decal to follow, completed model see "AM/TBY" |
 |
 |
 |
||
|
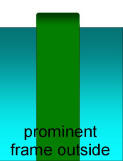
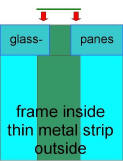
kit frame |
real construction |
the original |
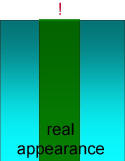
While aircraft designers took (and take) great pains in reducing drag kit manufacturers take great care in making them as obvious as possible. Taking aside some pre WW II aircraft the frames of cockpit hoods had recesses in which the glass panels rested, a thin metal strip atop to keep them in place. In effect a flush appearance. Not so in kits! The term "greenhouse" is taken as real appearance. Prominent ridges show where paint should be applied, pronounced height seeming mandatory. In the real thing such protuberances would stick out two to three inches above glass level.
Examples of cockpit hood framing (German page)
Model canopy/frames: Masking the clear parts and sanding these unwanted "detail" off helps a little bit. In my opinion it's easier to make a new canopy, as told above.
For frames I use a decal not needed any more, paint it in appropriate color, and then cut out narrow strips. These are applied as usual with the help of a cotton bud wettened with softing agent (water soluable glue may help too). See model photo above.
Pigments in solvent. On the real object applied for protection and camouflage. On models to make them look like the original. And therefore the question is what the real colour looked like. No problem it seems for there are a lot of model paints (alledgedly) mixed to official formulas. But beware:
Because of scale effect a 100 percent correct colour is too dark for a model.
Therefore model paints have to be lightened. The smaller the scale the more. For 1/48 10 % should be sufficient, for 1/72 15 % are about right.
To get the right shade adding white isn't always correct. For red, green and brown it should be yellow, for this colour is included in each of these (though addition of a tiny amount of white can be helpful). For lightening dark blue use light blue.
Colours of US Navy aircraft in general (for others I am no expert): "Sea blue" wasn't simply dark blue. It contained a sizeable amount of "insignia blue" and black and may therefore described als black-blue. Even darker was/is "Insignia Blue" (the disk below the star); it is/was nearly black and not bright dark blue as many decals show. "Intermediate Blue" had a blueish gray appearance, by specification a shade exactly between "Sea Blue" and "Insignia White" (the bottom colour). Bleached "Sea Blue" (rarely seen) therefore got nearer to "Intermediate Blue". The previous "Blue Gray" was a little bit darker than "Intermediate Blue" but still contained so much blue that even if very bleached it held a blue tinge (never plain gray). In short: Exept white all these colours "aged" to variations of blue-gray (neither lighter blue nor plain gray).
Colors of the US Navy 1941 - 1945: "US Navy Colors 1941-1945"
Original USN colours see "Originalfarben" in German page O
Inside colours: Article in IPMS Stockholm website.
Tables of colours to Federal Standard (same source): http://www.ipmsstockholm.org/magazine/2006/01/stuff_eng_tech_fsserver.htm