 |
| SB2U-3, Accurate Miniatures 1/48 |
| Modifications and additions: |
| Model by Wilfried Eck | ||
|
||
|
|
Intended as a Scout Bomber (hence the designation SB) the second of its kind produced by Vought (United Aircraft) was slow with sluggish control response, in the required secondary mission, dive bombing, only shallow dives were possible. The only noteworthy achievement, and this being a remarkably one, was its range. When VMSB-231 transferred from Ewa/Hawaii to Midway flight time was 9 hours and 45 minutes!
The aircraft mentioned was the long range version of the Marine Corps, the dash 3 version of the SB2U Vindicator, featuring an additional fuel tank in the fuselage above the wings. Armament was increased to four .50’’ machine guns which in the field was immediately reduced to reduce weight.
Why Accurate Miniatures (AccM) chose this rather inferior type is open to question. The achievements of the SB2C-3 during the battle of Midway being practically nil (whether the a/c of Capt Fleming was deliberately crashed on the gun turret of the cruiser Mikuma or ended there due to lack of control is a matter of speculation). On the other side AccM deserves praise for the issue of such an off beat kit.
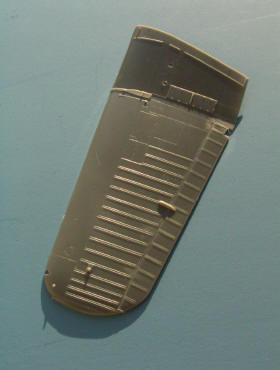
On the first sight a box of substantial dimension contains a wealth of parts, the crew stations being treated especially well. Also the representation of the fabric covering the fuselage is very convincing. This can’t be said of the wings where the fabric covering grossly overdone. In reality there wouldn’t be thin fabric strips but laths of sizeable dimensions. The same goes for ailerons and empennage. The navigation light is represented as lantern, some access panels would protude roughly four inches in the real a/c. In other words: Horribly overdetailed! The cockpit enclosure is transparent throughout whereas in the real thing the part between the crew stations was metal covered. As the ribs are shown rather prominent I didn’t bother with correction but decided to make new cockpit hoods from the start.
|
|
|
oversized ribs and panels |
NO WOODEN BLOCK NEEDED! Carving and filing a wooden block is decidedly old fashioned. Today there is POLYESTER and – at least in Germany – a plasticine called “FIMO”. In the first case Polyester is mixed with 4 % hardener. When this dough begins to harden it can be carved roughly to shape in the end being as hard as wood and can be sanded to final form; polishing is also possible. Fimo ist shaped to final form from the outset, 170° C in the oven making it hard. It can be polished too, but unlike Polyester addition of material afterwards is not possible. In my case I made a form of thin plastic at first, the original cockpit hood furnishing the correct outline of the two endplates. This was the “bed” the polyester was to lay in, with a strip of wood to get a handle. How to make cockpit hoods is told on page C. When this new hood was ready I added thin plastic strips on the lower inner sides, protruding slightly so the whole part could be fixed in thin slits in the appropriate part of the fuselage. The ribs are thin strips of decal painted in fuselage colour.
How to make canopies see ABC-page C, "Cockpit hoods scratch".
Now came the difficult part. After some not so convincing experiments to replace the overdone ribbing of the wings I came out with the following solution: At first the position of the ribs was slightly scribed in with a sharp scalpel. Then all ribs were sanded off using sandpaper of successive finer grain and some polishing paste to get a shiny surface. Then I covered the wings with transparent tape. Taking a rule and said sharp scalpel narrow strips of tape were cut out according to the lines scribed in previously. Now some portion of filler was mixed with fluid glue and this carefully spread over the appropriate portion of the wings. Let dry thoroughly then remove the tape. Finally these “ribs” are slightly sanded.
|
|
|
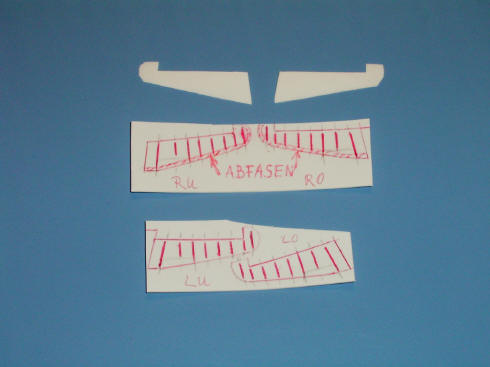
parts for rudder and elevatos |
New elevators and rudder were made in a different way: Thin plastic sheet is placed on a newspaper or else. The position of the ribs is drawn with a pencil and scribed in with a ball pen. This produces slight ridges on the underside (future upper sides), and that's all as fabric covering is very taut (no sagging). Make upper and lower part for each control surface to be glued on a wedge forming the core. To get sharp rear edges the plastic has to be sanded on the inner side to wedge shape, the core wedge ending a little bit in front. For joining upper and lower parts either use plastic glue very sparingly (to prevent glue getting into the ribs) or cyan acrylate (super glue), especially for the rear edges which are very thin and prone to melt. Covering the upper surface with tape prevents fingerprints or worse, it's also very helpful for joining the rear edges in a straight line. After the glue has set the front edges are sanded to shape.
|
|
|
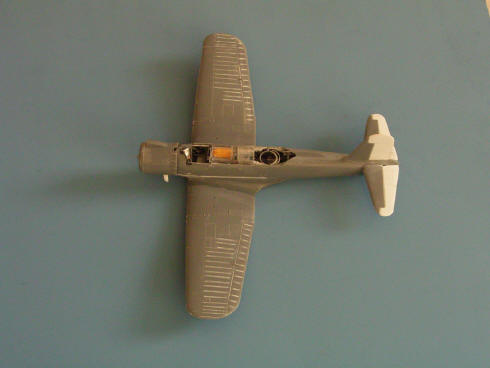
ready for paint (exhausts not yet fixed in) |
Do not lower the landing flaps/dive brakes when the model is to rest on its landing gear without a pilot in the cockpit. For parking flaps are in the closed position (the exeption being the P-51 where lack of hydraulic pressure caused them to fall down). Also the rear machine gun is removed from its stowed position only when in danger of getting attacked (very bad representation of this part by AccM). When using figures for the crew stations the radioman/gunner normally looks forward (turning only to man the MG).
Navigation/running lights were made out of clear sprue heat formed over a candle, colour by permanent marker (see page "lights"). Pitot steel wire.
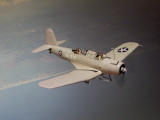
Concerning colours AccM instructions – blue gray over light gray - are quite correct, but certainly not in the part of ageing. In the rare photos of Midway based Vindicators light coloured stripes appear to have been applied over darker paint with soft outer edges. What’s the use of spraying paint over rotten fabric covering? – In the late thirties Midway was a central base for flying boats therefore well furnished with everything needed for maintenance. And certainly no pilot would man a plane prone to shed its parts. In short: Slight bleaching of paint yes, anything more NO!
Decals are provided for each SB2U-3 participating in the battle, a fine painting being provided as guide for one although the appearance of the others remains to own research. The standard inscription on the rudder, in this case “SB2U-3” is lacking.
I chose to show a prewar Vidicator in neutrality paint (decals are provided). Pilot and gunner are my own creations (using heads and hands from Verlinden figures).
General thoughts and tips for modeling see "Modeling ABC"
![]()