 |
| General Motors/Eastern FM-2, HobbyBoss 1/48 |
| Modifications and additions: |
| Model by Wilfried Eck | ||
|
||
|
|
(+) On the plus side:
|
|
|
|
|
(-) On the minus side:
|
|
|
|
|
|
To fill in the tiny holes the assembled model was covered with thinned putty and sanded after this had dried (same procedure for making a more convincing fabric covering on the upper part of the ailerons).
The motor should be enhanced by adding ignition ring and -cables.
For the cowling there is only one way: Scratch (just like making cockpit hoods - see "C.-Hauben selbst ziehen"; to say: Mould ring and two side parts, then butt joined). Same way for both parts of cockpit hood.
Mass balances thin metal wire (0,25 resp. 0,5 cm from tips) resting in small grooves. Vertical tail: Replace front of rudder (forward of hinge line) with a small plastic part, sand to shape.
Another point of notice is the panel behind the cowling. It was Grumman custom (taken over by GM) to make it protude slightly on the rear end (see also F4F, F6F, TBF). Not noticed by any kit manufacturer (so no blame on HB). To make this part more like it appeared in original form the plastic was carefully scraped away on the front, upper and lower edges so an aluminum panel got a flush fit. By help of a ball pen the exhaust channel could be depressed as needed. To fix it use any glue you like. After this has settled I added depressions (depicting screws) along three edges.
A pin was used as an axle for the propeller/airscrew; it rests in a tube made from a cottom bud.
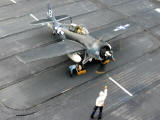
Instead of the proposed paint scheme (Glossy Sea Blue over all surfaces) I preferred the three tone paint scheme of another aircraft on CVE-73 Gambier Bay.
Pilot and figurines hand made from plastic block and sprue parts, heads and hands from Verlinden figures.
General thoughts and tips for modeling see "Modeling ABC"
![]()