|
||||||
Modelling-ABC by Wilfried Eck |
P
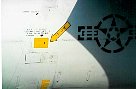
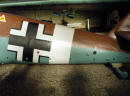
When having a close look at a real airplane you'll notice much less panel lines than the kit you bought has. And if they correspond you'll see the grooves in your model are nearly the same width as the original ones. In other words grossly exaggerated. In a real airplane panel joints are very narrow. About the size of a pencil line (less than one millimeter). Noticeable gaps would not only weaken the structure but would create so much drag that the plane would hardly take to the air. Or disintegrate at higher speeds. Normally panel lines are just noticeable around removeable maintenance panels. In painted airplanes other joints are barely visible because paint crept into them. The next point is that there may be butt joints on structural panels but overlapping riveting as well. On most wartime planes panels were overlapping so there wasn't any depression around them. And usually they were smoothed by putty.
A Me 109 fuselage had overlapping panels on the rear fuselage (most other WW II types too). But all kits I know show vertical grooves. - Is there any necessecity to accentuate non existing grooves with black paint?
Accumulated dirt I've been told. Well, if there is a butt joint. But no kit manufacturer can reproduce fractions of a millimeter. And dirt doesn't make a panel joint broader.
My personal description for a combination of filler and cement. It sticks well both to PVC and kit plastic. Mostly I use it for fixing own canopies to the fuselage. Another utilisation is to fill gaps between parts which need strenght (wing fuselage joint for instance). But it's not just filling. It can also be used to build up structures. Leather flying helmets, clothing, hair (hairstyle moulded with a pencil after the plastic is semi hard, strands of hair by cuts with a sharp knive after the plastic is nearly hard) and so on.
Drawback is the time it needs to harden and there is also some shrinking. The latter can be overcome by applying more material than needed and sanding after it has settled.
To make it, simply mix filaments from a plastic tree with liquid plastic cement. Stir and wait a few minutes untill all filaments are dissolved. More cement makes it more liquid, less less.
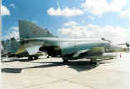
| 1. | Undispensable source of information what
the real thing looked like. But take care: Quite a few were taken
exclusively for propaganda purposes and do not depict the real situation.
The most common: Leisurely arranged people in the cockpit or draped in front
of the aircraft, reading maps or chatting (in reality briefing is in the
squadron room and before/after a mission nobody is in the mood to grin into
a camera; in aircraft carrier operations posing for the photographer is
outright impossible because aircraft are packed very tight). In some photos
of German nightfighters there are bright searchlights in the background. In
reality the pilot would have been blinded so much that even takeoff would
have been impossible. On US Navy and Marines aircraft "kill markings" mostly
were stickers, applied only for this particular photo session. Japanese
aircraft found in the scrapyard on some Pacific island also are not
representative of the actual appearance the operational ones had. And so
on. On the other side every aircraft carrier has/had his photographers mate responsible for filming everything on the flight deck during starts oder landings. These genuine pictures show how it really was (not always glamourous). The problem: After WW II some information of time and location was lost. Therefore even with a "National archives" label you have to be an expert to distinguish between authentic and spurious capations (a Japanese "Jill" can't appear in the battle of Midway). |
| 2. | If in a photo your model looks like the
real one you built it the right way. To create an absolutely correct
miniature replica was the goal of your efforts, wasn't it? - Why spoil it
with imaginary "ageing" (See page A). It's astounding, what a photo reveals. Especially mistakes. But also imperfect mouldings. The most glaring examples being rounded trailing edges and exaggerated grooves. But also too thick canopies can show a model very clearly. On the other side its astonishing which imperfections do not show. Secondly: For a convincing look a model naturally needs an appropriate environment. Do not place it on the kitchen table, lighted from the lamp above (the photo gets a yellow tint, the flowers of the table cloth are far too large). Get into the open (preferably before noon, because there is more blue in the sky) and use a suitable back- and underground. This is easily done. Take a box of suitable size, cut off three vertical sides, but leave a triangle left and right to hold the remaining vertical side upright. Here your background poster is fixed. The horizontal part gets a suitable underground (painted cardboard, see next). Now comes the problem of scale. Due to the size of a real aircraft there is more of the underside than of the topside to be seen. Contrary to the model. As real aircraft seldom are photographed from atop a ladder, your camera has to be lowered accordingly. Normally this would bring your camera lens halfway below the surface. Therefore a trick is needed: The front part of the underground cardboard is slightly bent down. About two thirds should be horizontal to take your model, one third gently slopes down. If done properly you get the right angle for the camera and enough underground for a convincing picture. An underlying piece of styrofoam or anything else (also approx. two thirds) takes care of the height difference. A tripod for your camera is preferable but not absolutely necessary.
As shown in "Modellfotos 3" a homemade hangar can also be used. These photos are not absolutely convincing, but the photos were easily taken. On the other side there are some photos I took in the seventies which were taken for real by everyone. Because the models were built according to the appearance of real airplane (and not the advice of nowadays "experts"). Good luck! |