 |
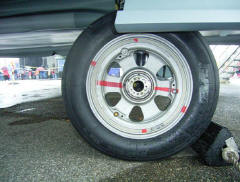 | |
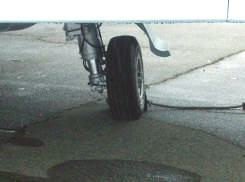
| high pressure tire, no bulges on sides | high pressure tire, minimal flattening |
Modelling-ABC by Wilfried Eck |
L
| Landing gear: |
|
Mechanical installation to allow an aircraft to roll on the ground and prevent propellers hitting it. Either a tubular device - leg - carrying one or more wheels to a complex framework on some heavier aircraft (generally called undercarriage). On aircraft operating on ice or snow skids are installed, floats on water based ones.
In model kits the landing gear needs special attention. If the leg/undercarriage with wheels provisionally attched fits exactly into the wheel well (decompressed state) it is too long. The manufacturer hasn't taken gravity, the compression due to weigth, into account. The model will stand with the nose pointing upward in an unrealistic angle. If the landing gear consists of oblique struts the hydraulic cylinder (from landing gear to fuselage) needs check. Too long results in a flatter stance. In example F-8 Crusaders usually rest with the rear fuselage very low, tail pipe almost on the ground, A-7's as well.
The next question is how much the tire of the wheel is flattened by weigth. In modellers belief quite a lot. To show even the short sighted ones this item has been taken care of, either by the modeller or from the outset by the manufacturer. In reality high pressure tires of modern aircraft - especially carrier based ones - show very little flattening. Half flat they'd blow during takeoff or getting compressed to the rim of the hub when the plane hits the ground during landing. No pilot in sane mind would take off with improperly filled tires. Certainly not half flat ones.
So check the tires of your car (or others on the parking lot). Comparatively to aircraft they are filled with medium to low pressure.
For painting wheels see page W.
Navigation-, position- and warning lights usually seen on aircraft are made very easy for model aircraft. All you need is a candle or another appropriate flame and some clear sprue from the kit parts.
Scetch and description see separate page.
|
|
|
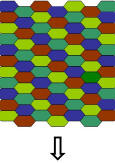
pattern continues lengthwise |
Printed colours on fabric covering of German WW I aircraft. Regardless of the many colours used there were two different shades: Darker for upper sides, lighter for undersides. This pattern was printed lengthwise but again differing considerably, those used on fighters mostly being irregular while on bombers regular hexagonals were usual. Depending on the individual aircraft manufacturer or type the layers of cloth went chord- or spanwise, the most common use however being chordwise on wings and horizontal on fuselages.
This covering had three functions: First of all to provide a lifting surface. Secondly to reduce drag. And finally to protect the wooden parts of the inside from detoriating. As fabric soaks up water easily it had to get a protective covering too.
After the fabric covering was applied it got a first cover of shrinking dope. The severaly layers of clear varnish (the first one containing some shrinking dope too). In the outcome the fabric covering was taut like a drumskin and of high gloss.
As ailerons and rudders were covered separately, the pattern wasn't uniform. Also when combat damage had to be repaired.
The usual waves found in kits are pure concessions to detail freaks (not so speak of "textile structure" in 1/72!). The only noticeable protusions in fabric coverings were thin fabric strips sewn over the ribs of the aircraft (not generally common in WW I).
Recommended website: http://www.theaerodrome.com/index.php
"Ageing" of fabric covering: A fairy tale! The printed fabric was covered with layers of sealant and laquer making it glossy, taut and durable. And there were mechanics who made sure that everything was in order. Dull matte covering would have been an absurdity. Moreover, because engines of that time were often two-stroke, with the lubricating oil mixed with the fuel, at least the hull was oiled quite automatically by the exhaust gas. Somehow functioning as a sealant. Secondly an aircraft in these days didn't live long enough to get an aged appearance. Besides: Rotating radial engines never spilled black motor oil centered on the underside of the fuselage).
Modeling:
If the kit model shows sagging fabric between the ribs simply fill in with putty and sand after this has dried. In the outcome narrow protusions will show just as in the real thing (plastic normally is harder than putty).
Exaggerated ribbing can be cured by simulating the fabric strips usually covering the threads fixing the fabric to the ribs. Slightly inscribe position of the ribs, then sand all off; transparent adhesive foil is placed over the wing and narrow strips cut out where the ribs should be. Mix putty with liquid glue and spread it evenly into the recesses cut out before. Let dry thoroughly then remove foil. If necessary carefully sand edges of the protusions simulating ribs and covers.
Alternatively: New wings or rudders are easily made, see page "fabric covering".