|
|
|||
|
Spiraled handles |
Scratch built F-8H seat |
Modelling-ABC by Wilfried Eck |
E
| Ejection seat | Escort carrier | Exaggeration | Exhaust stains |
Rocket powered device to remove pilot/s as quickly as possible from the aircraft. In modern seats the parachute is an integral part of the seat, usually kept in a container above/behind the shoulders of the pilot. Also included are straps or other devices to prevent flailing of arms or legs in the airstream.
Kit ejection seats usually lack detail. Mostly because of moulding restrictions but also for cost reduction. Commonly the model seat bucket has walls too thick. In the original they are a thin sheet of metal which cannot be reproduced adequately in model form. What could be done better are the straps which fasten the pilot to the seat and - the other pair - that go to the parachute pack. They lack depth. Not to forget the two slings on top which in pre-modern seats had to be pulled down for ejection. For manufacturing purposes mostly they are not to scale too.
No problem, the after market business has nearly everthing in all scales. Again side walls are too thick and ejection handles either missing oder too thick. As painting of the straps isn't too easy too and the price of these things rather high I considered scratch building a worthwile alternative. And to my surprise it wasn't as difficult as it seems.
Without the rocket installation (not to be seen in a model) an ejection seat consists of the following parts: firing rails, cannon, seat back, seat bucket, cushions, parachute container, top part, holdback- and parachute straps. Last not least there are some handles and some tubings on the sides.
| ejection seat pages: | http://users.bestweb.net/~kcoyne/frame_sg.htm |
| F-104 G German AF GC-7A seat: | OF.1/GC-7A.of.htm |
Modeling:
Today, when you can buy (almost) everything, you can also buy the matching model
ejector seat as a resin part. But what if there is no offer in the case you are
looking for?
You do it the way I did it before:
The seat shell is made from thin aluminum sheet or plastic from a "convinience"
tray), the side guides from Evergreen profiles, the push rod in between from a
piece of the parts holder. Cut or filed plastic is used for the headrest, and
the same material is used for the seat and possibly the backrest cushion (in my
case the latter is often made of "FIMO" (hardenable plasticine) because it is
easy to make indentations).
The seat bucket is folded from thin plastic (for instance from a convinience food package) and glued together on the underside; the rails are from plastic sheet material, as are the rear parts of the seat; the parachute container is filed from some spare plastic in suitable thickness or formed from "Fimo"; the cushions from "FIMO" (a modeling paste which is hardened in the oven, see page F), ejection handles are made either from "Fimo" again (twisted yellow and black strings, formed to a "Brezel" shape) oder by wire (check for parallel or spiraled yellow/black lines, these above the head usually were spiraled not segmented). The straps and fittings can be made from aluminum foil or the top enclosure of a wine bottle (soft foil which accepts detailing too).
The most difficult part, the
pretzel-shaped release handles of MB ejection seats, I also make from FIM0, as
follows:
... from Fimo, as well as the
ejector seat handles, because this is the best way to depict that the yellow and
black stripes have a spiral shape and are not alternating sections, as usually
seen in models. To do this, small portions of yellow and black FIMO were softened by kneading and
each formed into a sausage, which is lengthened by further kneading until it's about twice the desired thickness. Then put the yellow and black
pieces together and twist them against each other while gently pulling them
apart until they are as thin as needed and enough yellow-black can be seen. Then
place a pretzel on a piece of thin aluminum sheet, the back two ends best
immediately on a small piece of red FIMO (the holder on the seat) and press
down. I then heat the sheet from below over a candle until the material starts
to shine and some "smoke" rises.
Allow to cool briefly, done. If something should break off before on the way (probably),
put aside as a reserve. Not always it succeeds at the first go. Fixing with
superglue.
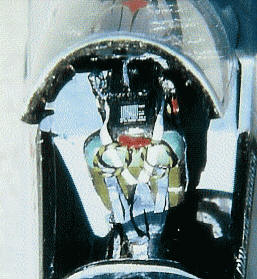
Example: Seat of a model F8H Crusader (see also T2V model):
|
|
|||
|
Spiraled handles |
Scratch built F-8H seat |
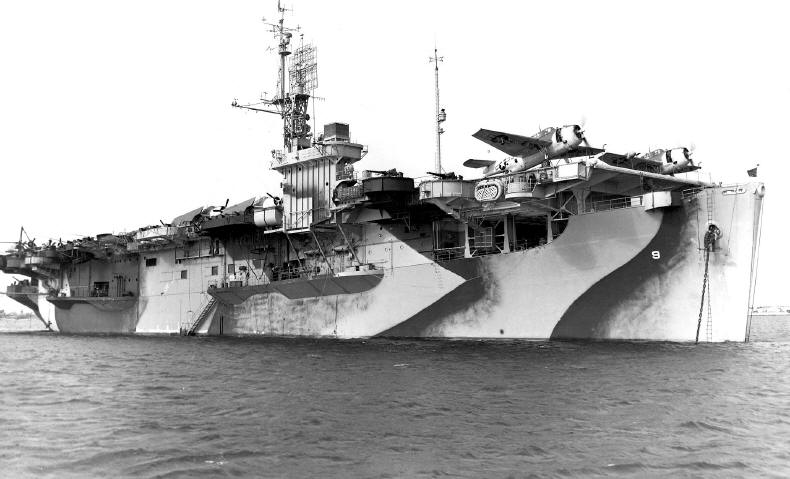 |
| CVE-9 "Bogue", first of the first class of escort carriers, now in camouflaged hull sides |
Type of auxiliary aircraft carriers originally destined to protect convoys from attacks of German submarines, but in US use soon taking over a multitude of tasks, mainly in the Pacific. At first hulls of transport ships ("Long Island" and Bogue-class) or tankers (Sangamon class) were used, their superstructure removed and a wooden flight deck with a tiny "island" (control center) added. Beginning with the "Kaiser-class" escort carriers were custom built in series.
Measuring less than 500 feet they carried an average of 30 aircraft, in US use usually F4F-4 or FM-1, FM-2 Wildcats and TBF/TBM Avengers; only the "Sangamon" class CVE's carrying F6F's instead of Wildcats. In British use a variety of types appeared, but again mixed between fighters and torpedo carrying types which could also be used for reconnaisance. Called "Woolworth carriers" (a not so flattering term) or "Jeep (nothing bigger) carriers" the official designation "CVE" sometimes being spelled as "combustible, vulnerable, expendable" also, these little ships nevertheless earned great respect. In pilot training (CVE-30), transportation of replacement planes, anti submarine patrol and covering of invasion forces they proved to be invaluable.
In operational use landing on these small ships was no easy task, operational losses generally exeeding those by enemy action. Though speed didn't exeed 19 knots, take off presented less problems, a single catapult being also used.
In effect more than one hundred were built during WW II, serving with distinction in every conceively action but sadly without attention of the media. Some of the Commencement-class CVE's served till the mid fifties, but the most long lived were a few of the first, "Card", "Breton" and "Croatan" being tasked with aircraft transport in the Vietnam war (though civilian operated).
|
|
|
|||||
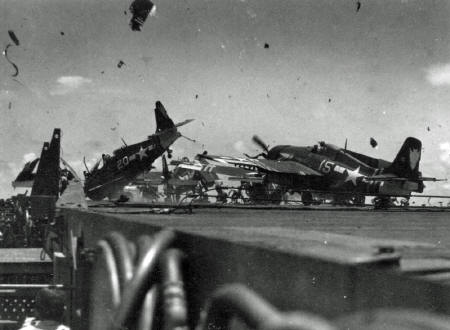
| light colored aircraft show CVE-64 ist to operate in the Atlantic | CVE-30 Charger hangar deck | landing not to the textbook on CVE-84 Nehenta Bay |
Useful Links:
Milestones of the Pacific war with maps and photos
http://www.chinfo.navy.mil/navpalib/ships/carriers/cv-escrt.html
http://www.hazegray.org/danfs/carriers/cve.htm
http://www.hazegray.org/navhist/carriers/us_esc2.htm
http://www.escortcarriers.com/
http://www.odyssey.dircon.co.uk/LEYTE_Casablancas_.htm
Markings of American CVE-based aircraft
Difference between a good and a bad model.
Admittedly aircraft (and ships and ...) sometimes show signs of environmental influence, stains and oil streaks, and occasionally also blemishes.
B U T to reproduce "ageing" and "weathering" (see there) first find out
in what environment and how long the original served;
what is physically possible and what is not;
what the size of a scratch would be if reproduced to scale;
if your skill enables you to reproduce the desired effect exactly.
Overdone "ageing" and "weathering" is absolutely unrealistic. A mechanic presenting such scrap would be court martialled.
So if you aren't an absolute artist, forget it. Aircraft (and ships and ...) are put into service in pristine condition. And they stay so for quite some time. Extremely worn aircraft are the exeption, not the rule.
It's no mistake to present a model Mosquito without silver specks.
|
|
|
click for enlarged picture |
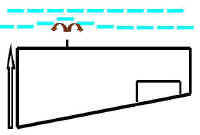
A propulsion unit that depends on burning fuel - be it the engine in a car or a jet - produces hot gas and unburned particles. Preferably more of the former. How much of the latter is exhausted into the air depends on a combination of several factors.
Technically spoken the combustion engine in your Mercedes works in the same way as a Rolls Royce Merlin (or whatever aircraft engine you like). If the exhaust shows pitch black smoke something is wrong. In a properly tuned engine exhaust gases are invisible. In the exhaust tube/s inevitable particles show as an almost white film.
This is no contradiction to exhaust stains sometimes seen on aircraft (especially smoke trails of early jet engines). You just have to take in consideration:
a) |
construction of engine |
b) |
quality of fuel and lubrication oil |
c) |
location of exhaust/s |
d) |
time |
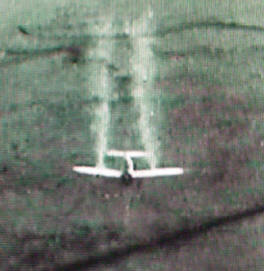
Excluding jets the last point mentioned is the most important. Dark exhaust stains need time to accumulate (for as said originally they are light in colour). Best example is one of the dirtiest airplane of all time, the AD-/A-1 Skyraider. While exhaust stains appear light in colour on dark (Sea Blue) painted aircraft, they appear dark on light (Lt. Gull Gray) coloured ones. The engine can't be the cause, it's the same. Is to say: Light coloured exhaust stains blend with a light paint finish. As layers of exhaust particles accumulate, they create a darker pattern. - And this needs time! And, not to forget, exhaust stains on Skyraiders show a multitude of colours. On light coloured aircraft they begin with a very dark brown and continually get lighter over medium to light brown and finally light gray.
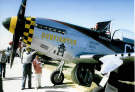
On the Skyraider exhaust stains are visible quite early because the exhaust tubes adhere to the fuselage. If exhaust tubes are protuding farther out, exhaust particles are thrown clear of the fuselage and therefore exhaust stains never are to be seen (examples. TBF/TBM, SBD, SB2C and so on). On the other side the exhaust stacks of the P-51 Mustang are as near to the fuselage as on the Skyraider but never do Mustangs show such dirty streaks. It's the engine that makes the difference. Merlins ran quite clean (click appropriate photo).
After modeling the A-1H I found another photo of this very machine. To my surprise exhaust streaks were very slight/short. Obviously in an earlier stage of operation. So it's no mistake to show a Skyraider model fairly clean.
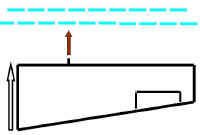
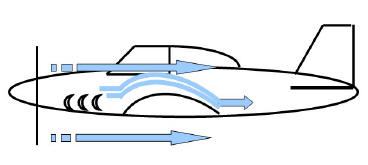
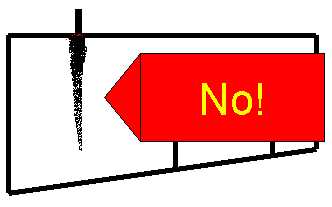
One mistake often seen on models are feathered exhaust stains. On wings this may be true, but on the fuselage exhaust streaks not only get lighter rearwards (on wings too) they also get narrower. Because of aerodynamic influence dust particles are thinned out and the fewer they are the less resistance they offer to the airstream. Over the wings air is sucked upwards (so creating lift) likewise exhaust particles from fuselage mounted exhausts are sucked upwards too. The rest of the airstream remains horizontally so two forces push the exhaust gases together. The result is a pattern not unlike an upward curved candle flame.
 |
|
Blue: Airstream (simplified) |
In summary: Check photos of the real airplane for the presence of exhaust stains and colour (nearly almost N O T black).
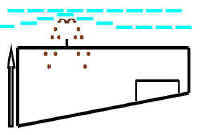
As guns are fired on the same principle as combustion engines, the above can be applied to gun streaks too. Did you ever see a gun emit a black cloud of smoke? - At least if it was manufactured after the American Civil War. And in contrast to aircraft exhausts wing or fuselage mounted guns are fired in the direction of the travel of the airplane. So the velocities of the emitted smoke (the projectile is faster than sound) and the aircraft are added. The ambient air is stationary. So the (light coloured) smoke in effect hits a wall and is accordingly dispersed. N E V E R is there any chance to form a narrow streak. And never were there such narrow black streaks seen on any airplane. If any, they were light coloured and an unmistakeble sign of either a protracted or a stationary gun use on the ground.
|
|
|
|
 |
Summary:
 |
Modeling:
Reproducing realistic exhaust stains is very very difficult. Especially when using an airbrush (fading out gets wider than narrower). Use of a template helps, but not so much. "Dry painting" with a brush gets better results, but needs much skill and tends to produce an uneven grainy texture. In my opinion crayons are best.
The various colours are first applied accordingly and then mixed together by light brushing with a cotton bud. A not so perfect result can be removed with a moist tissue or else.
(for example see: Modell A-1 H Skyraider)
If there still are some problems, try again
or simply forget it. Even Skyraiders flew for some time without any
visible dirt streaks.